• Skip to primary navigation
  • Skip to content
  • Skip to primary sidebar

BOMBCHEL'S KITCHEN

Foodie with a Bootie, sharing recipes and life hacks

  • Recipes
    • Fit to Order
    • Fit Foodie Archive
  • Fitness
  • Lifehacks
  • Journal
    • Travel
  • About Me
You are here: Home / Lifehacks / You Can’t Fix That with Duct Tape and Plastic Wrap

You Can’t Fix That with Duct Tape and Plastic Wrap

January 5, 2016 by Cheryl Marquez Leave a Comment

Bed slats
You know there are things you’re good at, things you are bad at and things you avoid. Home stuff makes my head explode, I’m not good at it and I try to avoid it as much as possible. When I rearranged my bedroom and slid the bed to a different wall, the center leg supports bent and cracked part of the middle beam. In my brilliance (not so much), I repaired the problem with duct tape and plastic wrap (see photos). I naïvely thought I could duct tape 2 pieces of wood on either side of the center beam to reinforce it. What I didn’t realize was the legs weren’t at 90 degree angles and that’s why the bed was caving in. I was super proud of this solution until I moved to the new bat cave which had cork floors, so the legs are more likely to get wonky.

This week, I’m borrowing a hammer, buying nails and getting wood at Orchard Supply or Home Depot to create a more permanent fix. I think I need pieces of wood in a corner shape to keep the existing legs vertical. Then buy 3 pieces of wood in a 2 x 2 inch square that is the same height as the current supports. The goal is to nail these 3 pieces of wood evenly across the center support to make sure the bed doesn’t come crashing down.
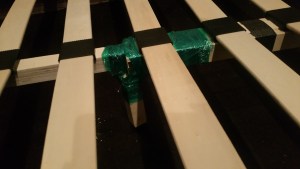
Bed slats: close up
Stay tuned for the next episode of Bombchel’s home improvement do what I say, not what I do installment. If you are an experienced DIYer, please comment with suggestions, thanks!

Share:

  • Click to share on Facebook (Opens in new window)
  • Click to share on Twitter (Opens in new window)
  • Click to share on Pinterest (Opens in new window)
  • Click to share on Reddit (Opens in new window)
  • Click to share on Telegram (Opens in new window)
  • Click to share on WhatsApp (Opens in new window)
  • Click to share on LinkedIn (Opens in new window)
  • Click to share on Pocket (Opens in new window)
  • More
  • Click to email a link to a friend (Opens in new window)
  • Click to print (Opens in new window)
  • Click to share on Tumblr (Opens in new window)

Like this:

Like Loading...

Related

Filed Under: Lifehacks Tagged With: bed diy, bedroom, diy

About Cheryl Marquez

Cheryl Marquez is an entrepreneurial digital marketing consultant and the former co-founder of Hand Things Down. When she is not jetsetting, she is obsessed with food, fitness & collaborating with amazing people. She describes her life as a constant adventure. Follow her on Twitter @cherylmarquez

Previous Post: « Green Smoothie: Apple & Kale
Next Post: #TechEats Eps1: Lunch at Yahoo »

Reader Interactions

What are your thoughts?Cancel reply

This site uses Akismet to reduce spam. Learn how your comment data is processed.

Primary Sidebar

Let’s connect!

  • View bombchelskitchen’s profile on Facebook
  • View bombchel’s profile on Instagram
  • View cherylmarquez’s profile on Pinterest
  • View cherylmarquez’s profile on LinkedIn

Welcome

Cheryl Marquez is an entrepreneurial digital marketing consultant and the former co-founder of Hand Things Down. When she is not jetsetting, she is obsessed with food, fitness & collaborating with amazing people. She describes her life as a constant adventure. Follow her on Twitter @cherylmarquez Let's dig deeper →

Bombchel occasionally uses affiliate links. If you click around and buy a featured product, I can get a commission from the sale at no cost to you. This helps pay for gym memberships and ingredients for the meals I share with you, thanks!

Copyright © 2025 —BOMBCHEL'S KITCHEN • All rights reserved.

Genesis Framework • WordPress • Log in

%d